Posts Tagged ‘Network’

!!! If you find this how-to helpful, please visit the blog http://jennandmaxweddingthreesome.wordpress.com/  My friends are trying to win contest to help fund their wedding.  They could use a few extra page views.  Thanks!

K so I lied kinda.  This article doesn’t show you how to turn it into a repeater (your router must support network bridging for that), but I figured I’d put both names in the title in-case you’re unfamiliar with the differences in terminology (like I was when I started researching this).

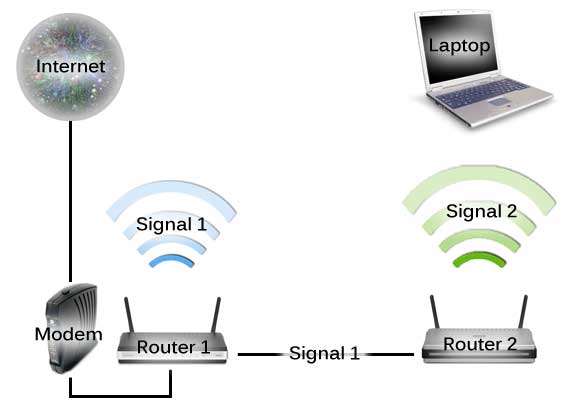
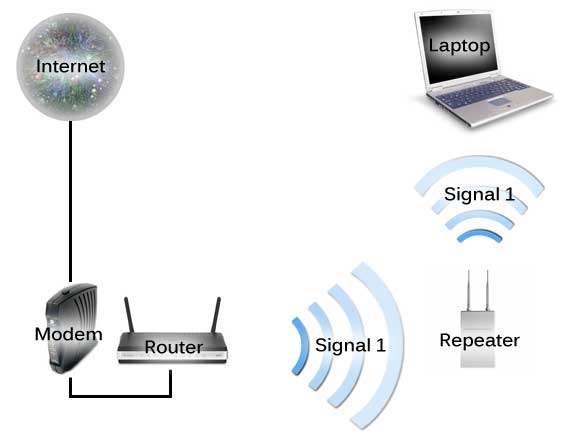
Repeater: A device or advanced router that will retransmit the signal from another wireless router.

Internet wired to Modem wired to router.  Router broadcasts to repeater.  Repeater broadcasts to computer.

Access Point: A router (connected to your original network) that broadcasts an entirely new signal, but connecting to it will allow you to access the original network.

Internet wired to modem wired to router wired to another router.  Second router broadcasts to computer.

Instructions
(The following assumes that you already have your modem and router set up, and would like to extend the wireless coverage)
——————

Step 1: Plug in the new router (the one you will use as the access point) to a electrical outlet, and use a straight-through network cable to hook your computer up to it in one of the LAN slots (1-4).  Note: Do not connect the new router to anything else just yet.  That will come in later steps.

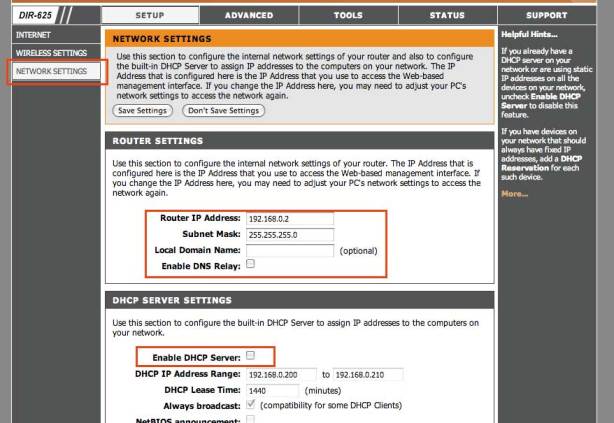
Step 2: Under ‘Network Settings’

Change the IP address of this new router so it is in the same subnet as the main router (I changed mine to 192.168.0.2),  but make sure it does not have the same IP address as the main router.

Note: After doing this, if you type 192.168.0.1 in your browser it will direct you to your main router, and 192.168.0.2 will direct you to this new access point

Ensure it has the same Subnet Mask as the main router (255.255.255.0)

Disable DNS Relay

Disable DHCP Server

Image of Network Settings Page

Image of Network Settings Page

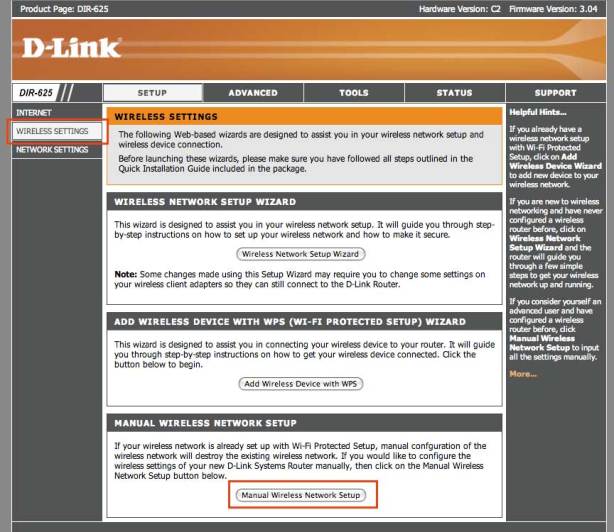
Step 3: Under ‘Wireless Settings’->’Manual Wireless Network Setup’

Wireless Settings Page

Wireless Settings Page

Give your network a name.  This can be the same as your previous wireless network or a new name.  My original router is broadcasting as ‘dlink’ and I called this one ‘Chris’

Set up some sort of security if you would like.
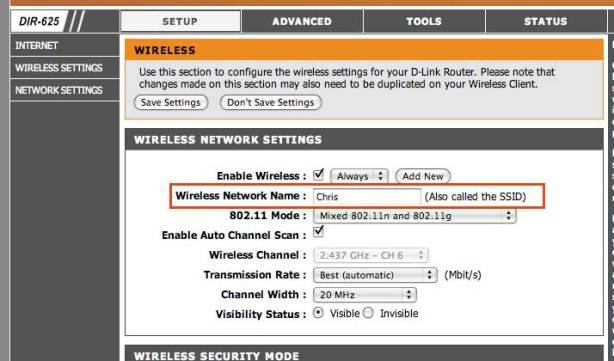
Wireless Setup Page

Wireless Setup Page

Step 4: Reboot your new router to save all the settings.  Now take a straight-through network cable and connect the two routers.  Plug one end into the LAN of the main router (spots 1-4), then plug the other end into the LAN of the new access point (spots 1-4) Do not plug it into WAN of the new access point!!! Although this seems logical, it does not work.

Step 5: Connect to your new router and bask in the glory.

Glory

Resources:
—————

http://www.dslreports.com/faq/11233
http://www.ezlan.net/router_AP.html

[+ reddit creddit for the comic above]

—————————————————————————————————————————–

Update:
Just moved into a new apartment and realized this works for another scenario: Rogers (and Bell and likely other cable/DSL providers do this as well) gave me an “SMC Networks” brand all-in-one modem / router.  Sweet right?  The problem is that it broadcasts in b and g but not in n (the fastest of them all)!  I mean, n has been out for YEARS and they try to give me a b / g router!?  This is just salt in the wound after Rogers, Bell and the CRTC tried to pass Usage Based Billing [1, 2, 3].    </rant>

What I ended up doing was setting up my D-link as an access point (as described above), plugging it into the SMC modem/router, but disabling wireless broadcasting on the SMC router.  This way, only one wireless signal is being broadcasted and it’s the one in n.
87 Avenue Road
Logo for Apple's Time Machine

Courtesy of Apple Inc.

So you have a Mac and instead of backing up to an external hard-drive ($$$) you’d like to backup to an NTFS drive that is on the network (maybe to your Windows 7 desktop machine)?  Sweet cuz that’s what this tutorial addresses!

What you’ll need:

  1. A Mac running OS 1.5 or higher with Time Machine Installed (I’m running 10.5.8)
  2. A separate computer with an NTFS-formatted hard-drive that has enough free space to fit all of the data you plan to backup (I created a a 500 GB NTFS partition on my Win 7 PC to backup my 200 GB Macbook Pro) Note: I don’t suggest using Paragon Partition Manager (aka ParaGONE Partition DAMAGER) to partition your PC as it wrote over my system partition and I couldn’t boot into Windows afterwards – “Missing Operating System”.  If you run into this issue as well, comment and I’ll tell you how I fixed this issue.

Follow these steps:

On your Windows 7 Machine

  1. Make sure you have a Windows password set up by going to Control Panel, click on ‘User Accounts and Family Safety’ and then ‘Change your Windows password’
  2. Turn on sharing by going to Control Panel and clicking on ‘Choose homegroup and sharing options’ under ‘Network and Internet’, select ‘Change advanced sharing settings…’ and under ‘Public’ click on ‘Turn on network discovery’, ‘Turn on file and printer sharing’, ‘Turn on sharing so anyone with network access can read and write files in the Public folders’, ‘Use 128-bit encryption…’ and ‘Turn on password protected sharing’.  Save your settings.
  3. Next, go to ‘Computer’ and right click on the drive you would like to backup to and click on ‘Share with -> Advanced sharing…’
  4. Click ‘Share this folder’ and give it a Share name (Mine is called TimeMachine)
  5. Click on ‘Permissions’ and with ‘Everyone’ selected, remove uncheck all the check boxes
  6. Click on ‘Add…’ and start typing your Windows Login name (mine is Chris-PC) and click on ‘Check Names’ and then select your Windows Login
  7. Click on ‘OK’ on all of the windows until they’re closed down
  8. Get your computer’s ip address by typing in cmd into the search box in your start menu and pressing ‘enter’, then when the black dos window comes up, type in ipconfig /all and scroll up to wherever it says IP Address (mine says IPv4 Address . . . . . . : 192.168.0.109).  Write this down.

On your Mac

  1. Go into Applications / Utilities and open up ‘Terminal’
  2. Copy and paste this command into terminal (all on one line)
    defaults write com.apple.systempreferences TMShowUnsupportedNetworkVolumes 1
    Apple does not display NTFS drives on the network, so this command allows you to see said drives
  3. Hit enter / return
  4. Mount your network drive by clicking on ‘Go -> Connect to Server…’, entering in smb:// followed by your Windows machine’s IP address you wrote down earlier.  OR you can use your Windows machine’s name (this is probably better).  (Mine is Chris-PC).  It will then prompt you for your windows login and password, then the volume you want to mount (mine is T: – TimeMachine).

    Courtesy of Lifehacker.com

  5. Start up Time Machine. Click on ‘Change Disk…’ and select the Windows drive you want to back up to (mine is TimeMachine).  Time Machine will fail this first time.  Before it does:
  6. in Finder, go to ‘Go -> Network’ and navigate into your backup drive.  You will see a file there with your MacName_MACAddress.tmp.sparsebundle.   Copy this name.
  7. Open up Disk Utility, Click ‘New Image’.  In the next steps the order is very important.
  8. Under the dropdown, select your computer name (Chris Macbook Pro) rather than Macintosh HD.
  9. Use the following settings:
    Save As MacName_MACAddress
    Volume name can be whatever
    Set volume size to the max amount of space you have allocated on your Windows machine.
    Volume Format: Mac OS Extended (Journaled)
    Encryption: none
    Partitions: ‘No Partition Map’
    Image Format: ‘Sparce Bundle Disk Image’
  10. Now change the dropdown from your computer name back to ‘Macintosh HD’. Save onto your Mac.
  11. Copy this file onto your Windows machine in the backup location
  12. Run Time machine again and it should be working!

Resources:

http://lifehacker.com/software/mac-os-x/how-to-mount-a-windows-shared-folder-on-your-mac-247148.php

http://www.jasonhdavis.com/blog/2008/08/network-drive-backup-with-time-machine-backup-to-ntfs-windows-xp-and-vista/

http://imulus.com/blog/george/software/using-leopard-time-machine-to-backup-of-a-network/